Mini Chocolate Cheesecake Bites for Parties
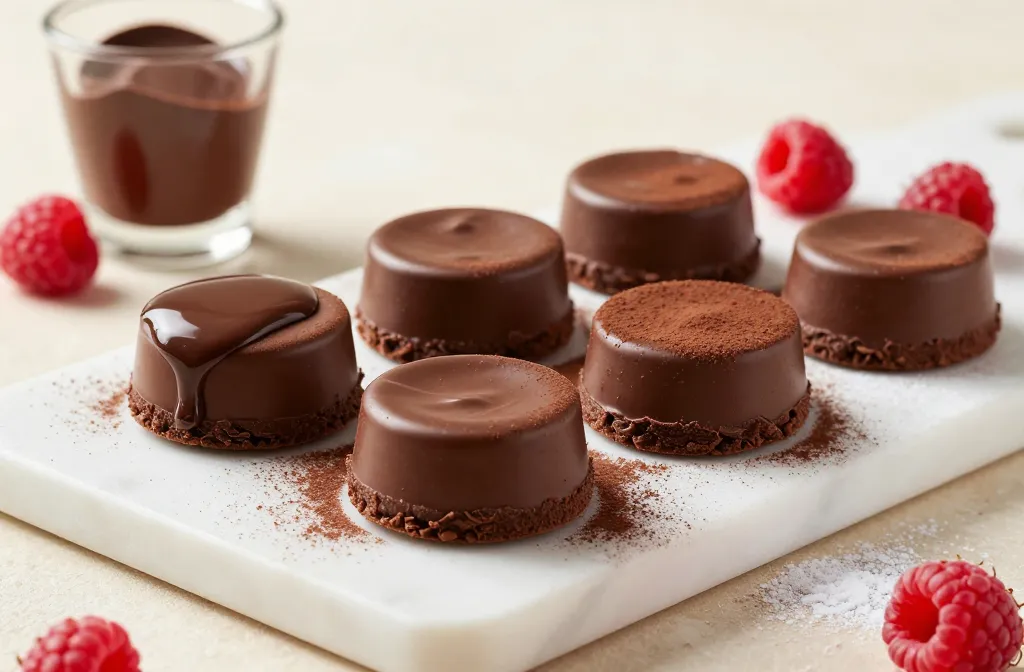
An instant crowd-pleaser that disappears faster than you can say “photo-worthy.” These mini chocolate cheesecake bites are the secret weapon at any gathering, from casual game nights to that fancy potluck you pretend you don’t care about. Ready to level up your dessert game without turning your kitchen into a science experiment? Let’s dive in.
Why Mini Cheesecake Bites Make Party Life Easier
Small, sweet, and incredibly portable, these bites solve a lot of party-planning headaches. No slicing, no serving drama, and no awkward moments when someone asks for the “cake-y stuff” with extra frosting. You get all the creamy richness of a full cheesecake in a size that’s basically two bites max—perfect for grazing tables and socializing without commitment.
The Core Recipe: What You’ll Need
Here’s what you should lay out before you start baking like a mad dessert scientist.
- Crust: crushed cookies (Graham or chocolate will do), a touch of butter, and a pinch of salt
- Filling: cream cheese, sugar, vanilla, cocoa powder, and a splash of sour cream or Greek yogurt for tang
- Chocolate glaze: melted chocolate and a dab of cream
- Optional toppings: sea salt, powdered sugar, raspberries, or a sprinkle of espresso powder
FYI, you don’t need a fancy mixer to win at this. A sturdy whisk or a hand mixer does the trick. And if you’re feeling extra lazy, use store-bought crusts and a good-quality cream cheese—your secret weapon for speed.
Step-by-Step: From Crust to Chocolate Glory
Crush Then Crunch: The Base
Crush your cookies until they resemble fine crumbs. Mix with a little melted butter and a pinch of salt. Press this into a mini muffin tin or into mini parchment cups. Chill while you whip the filling so the crust stays sturdy and not sad.
Filling That Makes People Melt
Beat cream cheese with sugar until smooth, then blend in vanilla, cocoa, and a splash of sour cream. The trick is to keep it airy—don’t overmix, or you’ll end up with a dense bite. Spoon or pipe the filling onto the crusts, filling nearly to the top.
Choco-Coat Magic
Melt your chocolate with a splash of cream. Dip, drizzle, or spoon a glossy glaze over each bite. If you want a neater look, tap the pan gently to settle air pockets before chilling again.
Chill To Thrill
Pop the tray into the fridge for at least an hour. Overnight is even better if you’re planning—spoiler: people will still devour them the moment they see them.
Flavor Twists: Elevate Without Complicating
Espresso Kick
Add a teaspoon of instant espresso powder to the filling. The chocolate will sing, and so will your mood when you see guests swoon at the first bite.
Peanut Butter Swirl
Blend 2 tablespoons of peanut butter into half the filling for a marbled effect. It tastes like a dream and looks fancy as heck.
Berry Burst
Top with fresh raspberries or a dollop of berry jam after glazing. The contrast between tart fruit and rich chocolate works wonders.
Make It Ahead: Party-Proof Scheduling
These bites are a dream for make-ahead hosting. Prepare the crusts a day ahead, keep them refrigerated, and whip the filling the morning of. Assembly time drops to minutes, and you’ll have more time to chat, snack, and pretend you’re a pastry pro.
Storage Tips
- Keep in an airtight container in the fridge for up to 4 days.
- Freeze for up to 2 months—thaw in the fridge before serving.
- Glisten with chocolate drizzle just before serving to keep them looking fresh.
Presentation That Wows Without a Full Stage Crew
A little plating goes a long way. Use a tiered tray to create height, scatter cocoa nibs for texture, and add a few decorative picks or mini forks. You want the bites to look like they were assembled by a bakery, not your average kitchen chaos.
Decoration on a Budget
- Dip the tips in white chocolate for a zebra effect on a few bites.
- Dust with cocoa powder or powdered sugar for that “photo shoot” finish.
- Label flavors with cute tags so guests know what they’re biting into.
Common Pitfalls and How to Dodge Them
First-timers often underestimate the chill time or overbeat the filling. Both lead to a less-than-epic texture. If the filling looks glossy but feels too soft, chill longer. If it’s grainy, you likely overheated the cream cheese—start over with cooler ingredients.
Texture Check
Press a tiny bit of filling between your fingers. It should hold its shape, not smear like frosting. If you see cracks after cooling, you might have over-baked. Reduce bake time next round or switch to a lower oven temperature.
Sweetness Balance
If your bites taste too cloying, add a splash more vanilla or a pinch of salt. The right amount of salt makes chocolate pop and cuts the sweetness in a good way.
FAQ
Can I make these without a crust?
Absolutely. Skip the crust and use a lighter base like crushed cookies mixed with a touch of butter, or even use a nut-based crust for a gluten-free option. It won’t be as sturdy, but it still tastes amazing.
What if I don’t have mini muffin tins?
You can still make them in a silicone muffin tray or even in a shallow dish cut into small squares. Just be prepared for a less snug bite, and adjust chilling time accordingly.
Can I substitute Greek yogurt for sour cream?
Yes. Greek yogurt adds tang and helps lighten the filling. Use plain, full-fat yogurt for best results.
How far in advance can I prepare these?
You can bake the crusts and mix the filling up to 2 days ahead. Assemble and glaze on the day you plan to serve for the freshest look.
Is there a vegan version?
You can use vegan cream cheese and a dairy-free butter substitute for the crust. Use coconut cream or a similar dairy-free option to keep the filling creamy. Chocolate needs to be dairy-free too for a fully vegan bite.
Conclusion
If you want dessert that travels well, looks pro, and still feels cozy, these mini chocolate cheesecake bites are your new best friend. They’re flexible, forgiving, and delicious enough to make you the hero of every party guest list. FYI, once you bring these to a gathering, you’ll get asked for the recipe more times than you can count. Ready to wow your crowd and sneak a few bites for yourself? Let the nibbling commence.