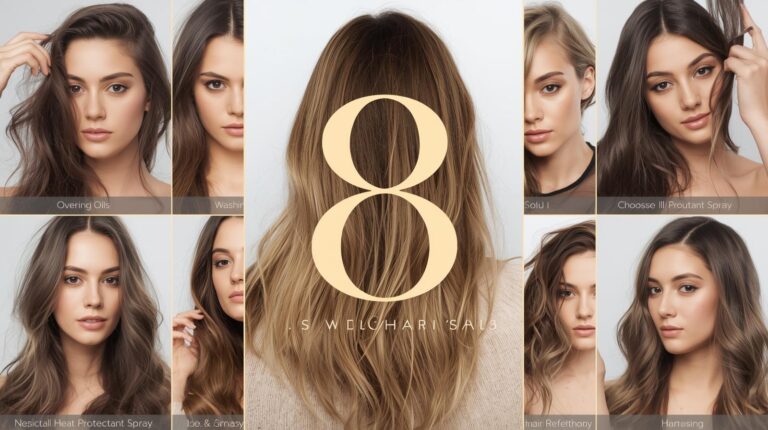
17 New Winter Sparkly Nails Designs to Try

Discovering these stunning new winter sparkly nails designs transformed my cold-weather style and gave me the glamorous manicures I always admired on others. I used to stick with boring solid colors during winter because I thought sparkly nails were too difficult to achieve at home. The dull, uninspiring nails made me feel less put-together during the festive season when everyone else looked glamorous. After experimenting with various techniques and following nail artists on social media, I found 17 gorgeous sparkly designs that are actually achievable and perfect for winter celebrations. These eye-catching looks elevate any outfit and make my hands look elegant even in the coldest months.
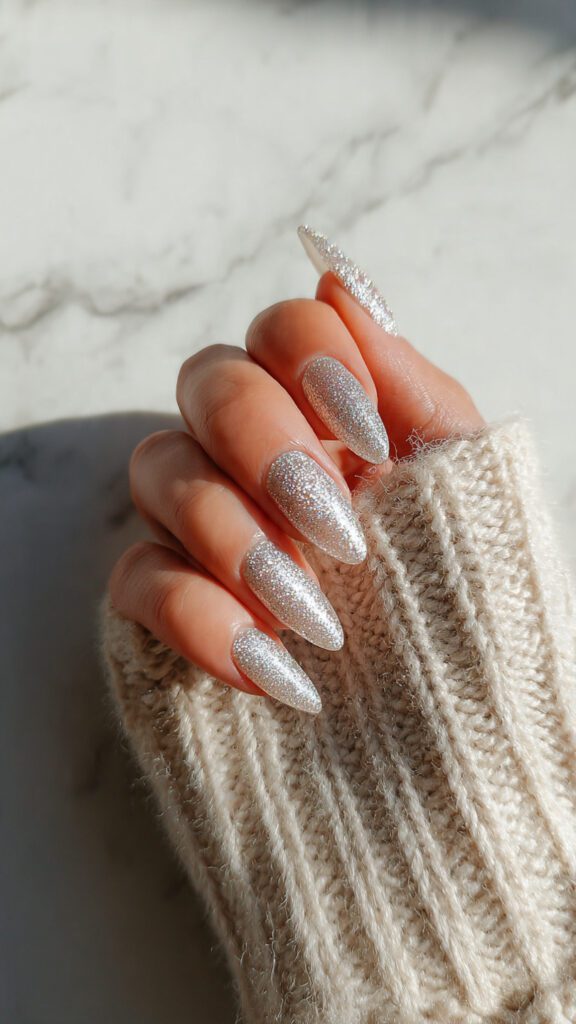
Design 1: Classic Silver Glitter Ombre
Silver glitter ombre became my go-to winter look for its elegant simplicity. I apply a nude base coat, then sponge silver glitter from the tips downward, creating a gradual fade. The effect looks sophisticated and works with any winter outfit, from casual sweaters to formal dresses.
This design catches light beautifully and makes my nails appear longer. I use fine silver glitter for a subtle look or chunky glitter for maximum sparkle. The ombre technique forgives minor imperfections, making it perfect for at-home application.
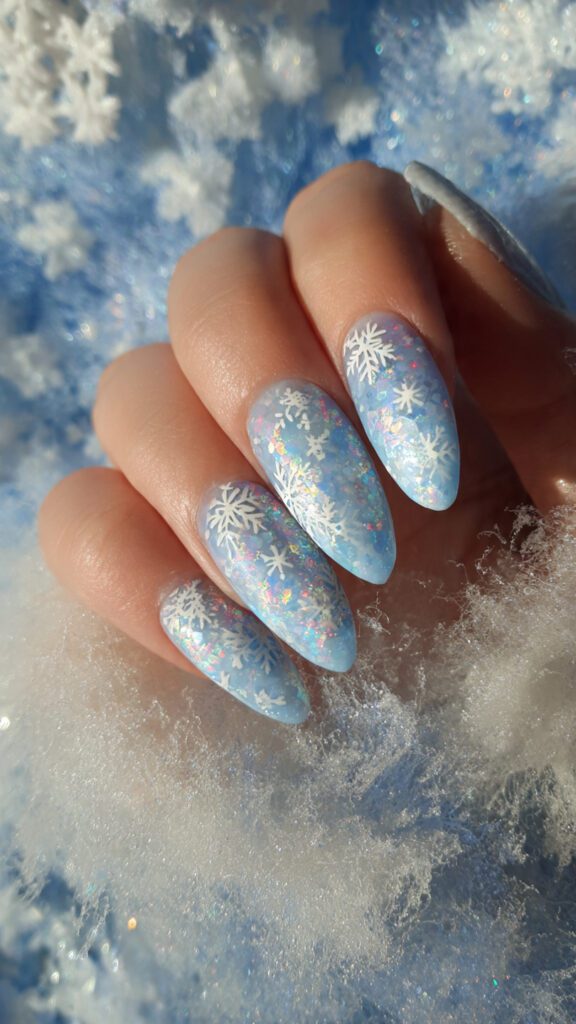
Design 2: Frozen Ice Crystal Effect
Creating an ice crystal effect captures winter’s magical essence perfectly. I apply a pale blue base, then use a thin brush with white polish to draw delicate crystalline patterns. Adding tiny holographic glitter pieces on top creates dimension that mimics real ice formations.
This design receives constant compliments during winter months. The intricate patterns look professional but only require basic nail art skills. I seal everything with a glossy top coat that makes the crystals appear three-dimensional.
Design 3: Rose Gold Sparkle Tips
Rose gold sparkle tips offer a warmer alternative to traditional silver. I paint my nails with a neutral pink base, then apply rose gold glitter concentrate to just the tips. The subtle glamour works for both daytime and evening occasions.
The rose gold tone complements winter skin tones beautifully and pairs well with gold jewelry. I find this design more wearable than full-nail glitter while still delivering that sparkly impact. The French tip style keeps it classy and appropriate for any setting.

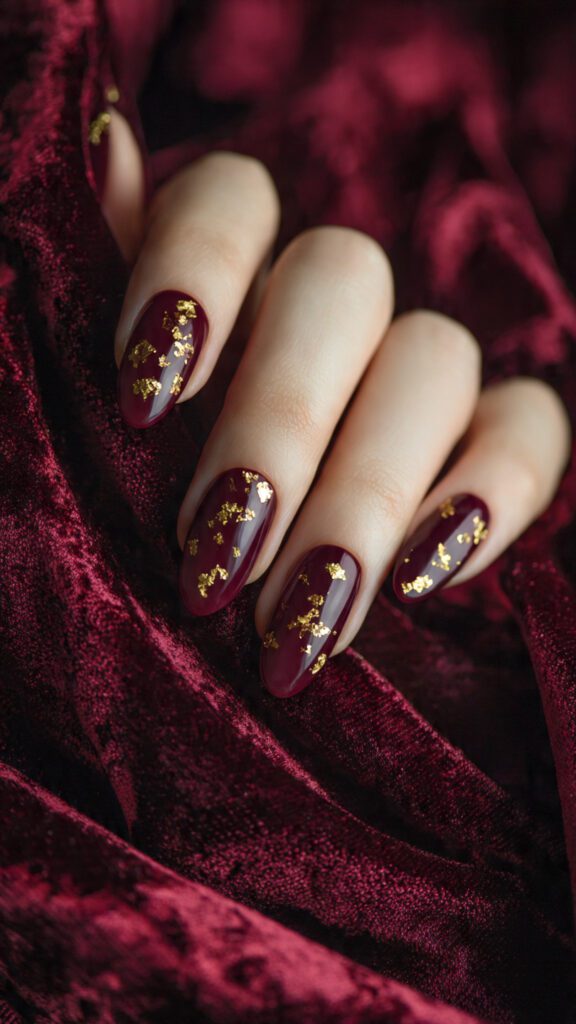
Design 4: Deep Burgundy with Gold Flakes
Deep burgundy nails with scattered gold flakes embody winter luxury. I apply two coats of rich burgundy polish, then press gold leaf flakes randomly across each nail while the polish is still tacky. The combination feels festive without being overly Christmas-themed.
This design transitions beautifully from Thanksgiving through New Year’s celebrations. The gold flakes catch light differently than regular glitter, creating an expensive-looking finish. I seal the flakes with gel top coat to prevent them from peeling off.
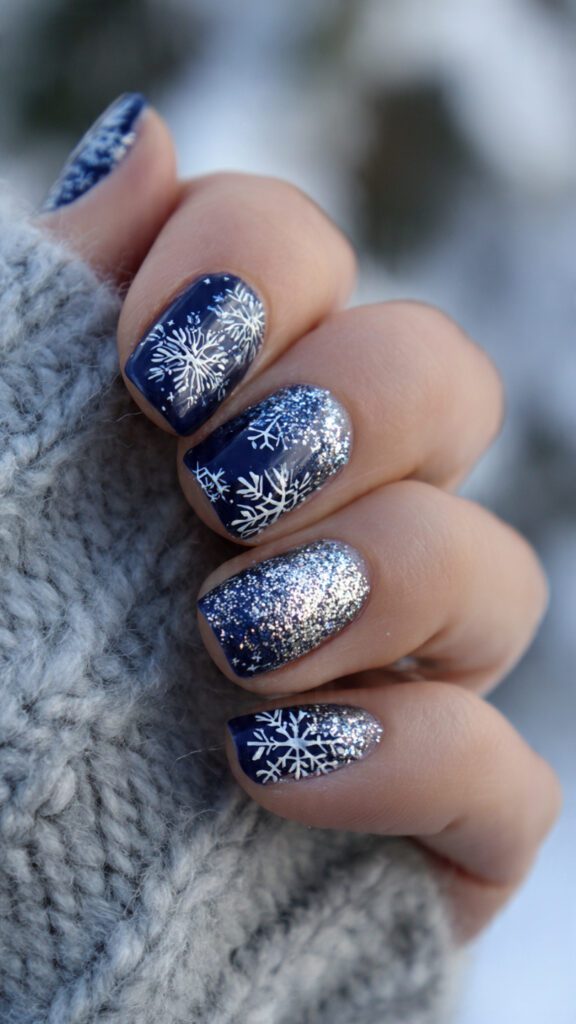
Design 5: Snowflake Stamping with Silver
Snowflake stamping lets me create intricate winter designs without freehand painting skills. I use a navy blue base and stamp white snowflakes, then add silver glitter to the snowflake centers. The technique produces professional-looking results in minutes.
The stamping plates offer countless snowflake patterns that never look identical. I vary the placement on each nail for a natural, scattered effect. Adding the silver glitter centers makes ordinary snowflakes extraordinary.
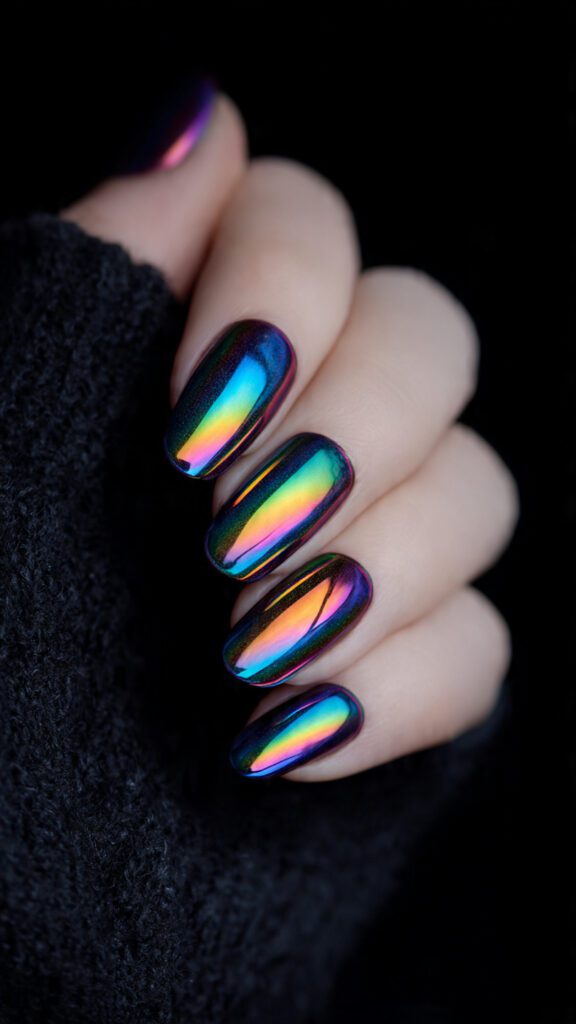
Design 6: Holographic Chrome Winter Nails
Holographic chrome powder creates the most mesmerizing sparkly effect I’ve ever achieved. I apply a black gel base, cure it, then rub holographic powder onto the tacky layer. The rainbow sparkle shifts colors depending on the angle and lighting.
This futuristic look feels perfect for winter party season. The chrome finish reflects light intensely, making my nails impossible to ignore. I protect the delicate finish with two layers of no-wipe gel top coat.
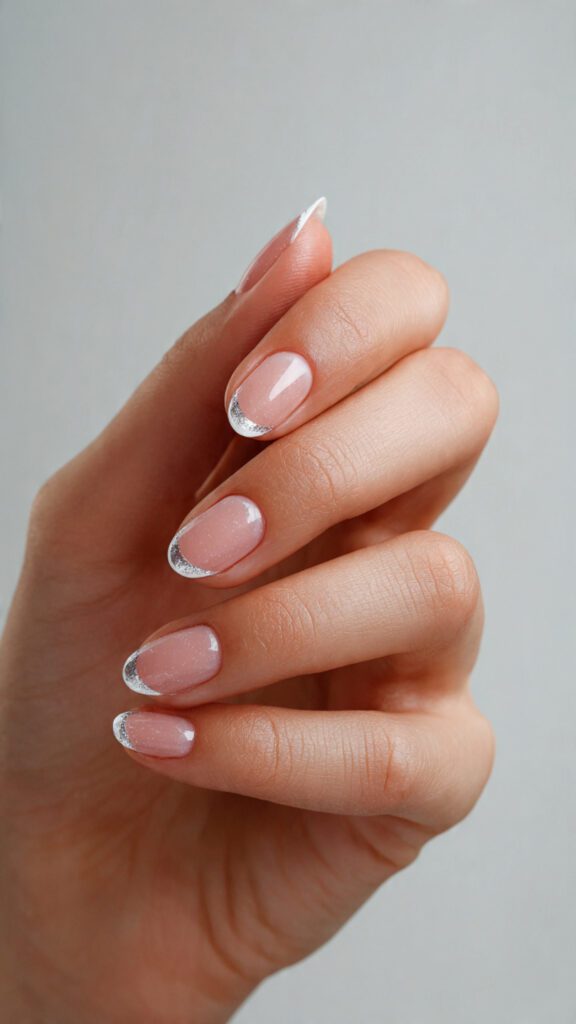
Design 7: White Tips with Silver Glitter Line
Adding a silver glitter line between white tips and nude base creates refined elegance. I paint classic French tips, then carefully apply a thin line of silver glitter polish where the white meets the nude. The detail elevates a traditional manicure into something special.
This subtle sparkle feels appropriate for professional settings while still being festive. The thin glitter line requires a steady hand but makes a huge impact. I use striping tape as a guide to keep the line perfectly straight.
Design 8: Midnight Blue Galaxy Nails
Galaxy nails capture the magic of winter night skies. I sponge various shades of blue and purple onto a black base, then splatter white polish for stars. Adding silver and blue glitter creates the sparkly cosmic effect that mesmerizes everyone.
This artistic design lets me be creative with color placement and intensity. No two nails look identical, which adds to the natural galaxy appearance. The generous glitter application ensures maximum sparkle factor.

Design 9: Champagne Glitter Gradient
Champagne glitter gradient nails exude sophisticated celebration vibes. I start with a nude base and gradually build champagne glitter density from cuticle to tip. The warm metallic tone flatters all skin tones and feels luxurious.
This design photographs beautifully and looks stunning in person. The gradient technique creates depth that solid glitter cannot achieve. I find champagne more wearable than yellow gold while still delivering warmth.
Design 10: Emerald Green with Gold Accents
Rich emerald green with strategic gold accents feels regal and festive. I paint all nails emerald except the ring finger, which gets full gold glitter coverage. Adding small gold glitter details to the emerald nails ties the look together.
The jewel-tone green captures winter’s elegance while the gold adds necessary sparkle. This color combination works for holiday parties and everyday winter wear. The accent nail prevents the look from feeling too heavy.

Design 11: Nude Nails with Glitter Cuticles
Reversing traditional glitter placement by concentrating sparkle near cuticles creates modern sophistication. I apply sheer nude polish, then carefully paint silver or gold glitter in a half-moon shape at each cuticle. The unexpected placement looks editorial and fresh.
This design elongates fingers visually while keeping nails practical for daily tasks. The majority of the nail remains nude, so sparkle doesn’t interfere with typing or other activities. I love how unique this placement looks compared to typical glitter nails.
Design 12: Plum Purple with Iridescent Flakes
Deep plum base with iridescent flakes creates mysterious winter glamour. I apply dark purple polish, then press iridescent cellophane flakes onto wet polish. The flakes shift between pink, blue, and green depending on lighting.
This design feels magical and perfect for winter’s moody atmosphere. The color-shifting flakes add dimension that regular glitter cannot match. I apply extra thick top coat to keep the delicate flakes secure.

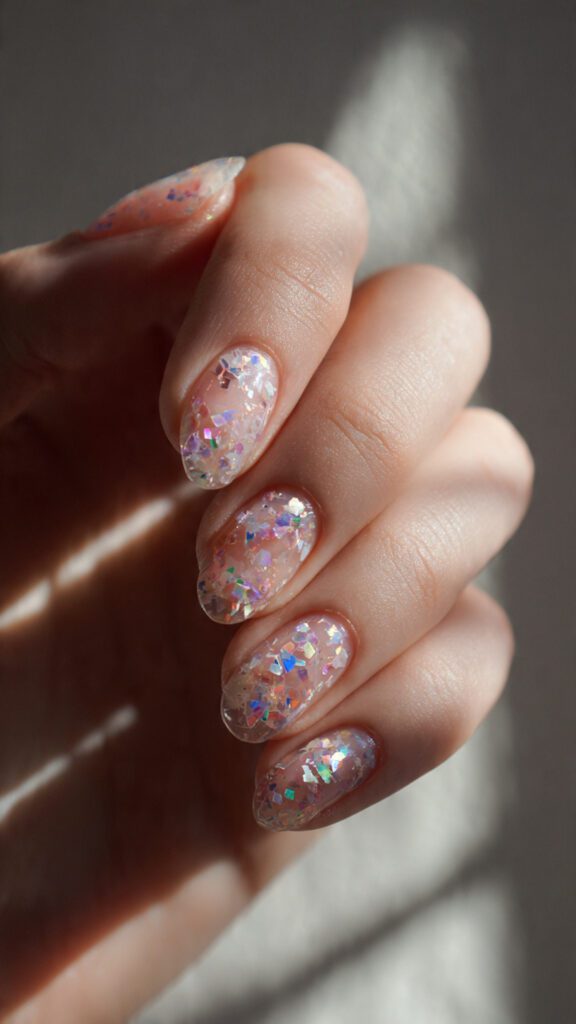
Design 13: Clear Nails with Scattered Glitter
Clear nails with scattered holographic glitter offer minimalist sparkle. I apply clear polish, then use a thin brush to place individual holographic glitter pieces randomly across each nail. The negative space keeps the look modern and breathable.
This design suits people who want sparkle without full color commitment. The scattered placement looks intentional and artistic rather than messy. I can adjust glitter density based on the occasion or my mood.
Design 14: Icy Blue Chrome Nails
Icy blue chrome nails capture frozen winter beauty perfectly. I apply light blue gel polish, then rub chrome powder for a mirror-like metallic finish. The cool tone and reflective surface embody winter’s crisp aesthetic.
This monochromatic look makes a bold statement without multiple colors. The chrome finish provides all the sparkle needed without actual glitter. I find this design easier to maintain than glitter since chrome doesn’t shed particles.

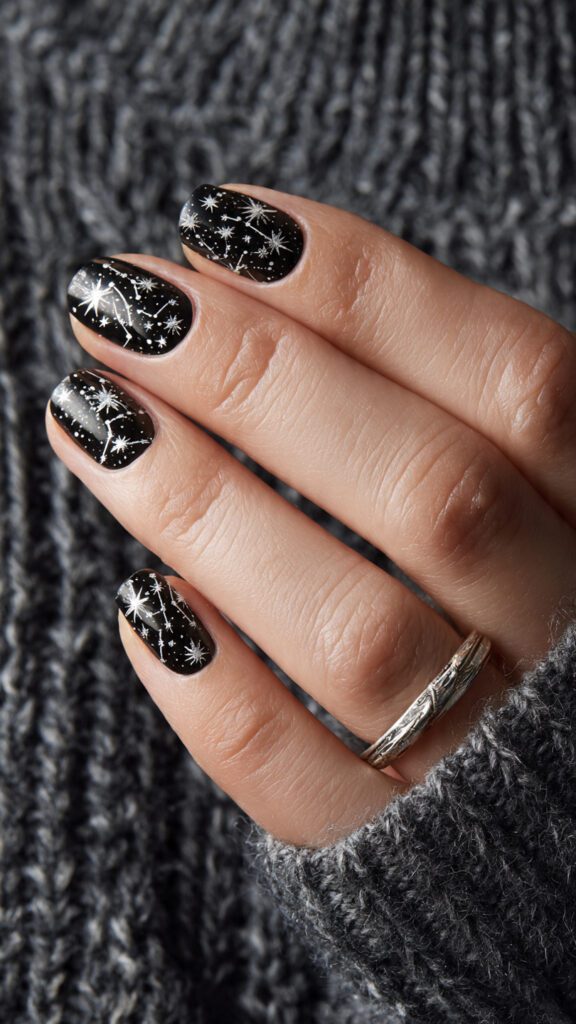
Design 15: Black Nails with Silver Constellation
Black nails with hand-painted silver constellations feel celestial and sophisticated. I paint nails black, then use a dotting tool with silver glitter polish to create star patterns. Connecting some dots with thin silver lines forms recognizable constellations.
This design appeals to my love of astronomy while being perfectly winter-appropriate. The black base makes silver sparkle pop dramatically. I research actual constellation patterns to make my nails educational and beautiful.
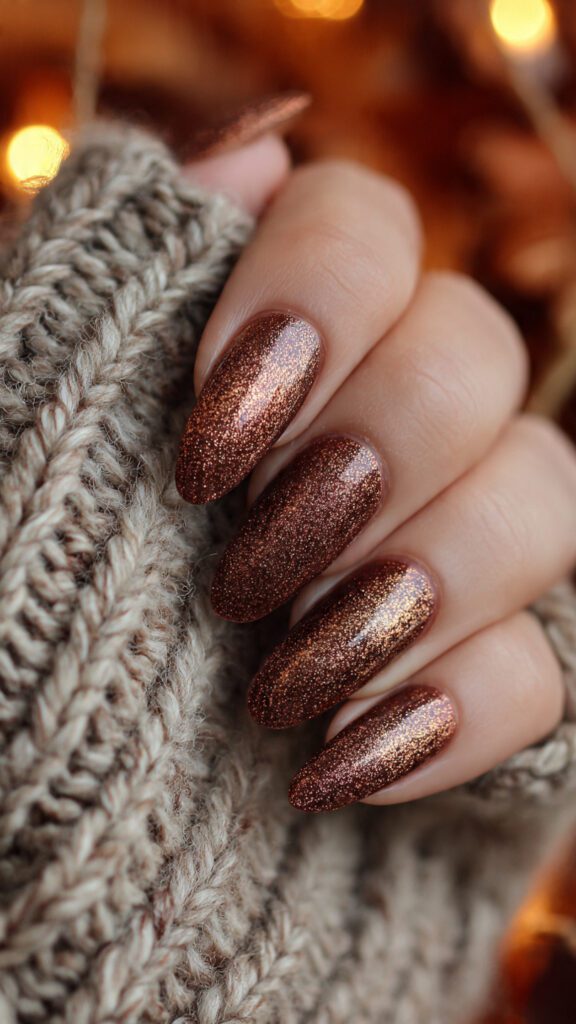
Design 16: Metallic Copper with Bronze Glitter
Warm metallic copper with bronze glitter brings unexpected richness to winter nails. I apply copper metallic polish, then add bronze glitter to tips or as an accent nail. The warm tones feel cozy and complement winter fashion colors.
This color combination stands out from typical winter silver and gold options. The metallic base already shimmers, and bronze glitter amplifies the effect beautifully. I find these warm tones more flattering against my winter skin.
Design 17: Mixed Glitter Confetti Nails
Mixed glitter confetti nails celebrate winter festivities with maximum sparkle. I apply clear or nude base, then press various sizes and colors of glitter pieces onto wet polish. The random placement creates a party-ready look.
This playful design lets me use up leftover glitters from other projects. The mixed textures and colors create visual interest that solid glitter lacks. I seal everything with gel top coat to prevent glitter from catching on clothing.